> ## Documentation Index
> Fetch the complete documentation index at: https://docs.squarecloud.app/llms.txt
> Use this file to discover all available pages before exploring further.
# Quickstart
> Go from zero to hero in minutes with Square Cloud. This guide will help you get started with Square Cloud and understand the power of our platform.
## Square Cloud Services 🚀
Square Cloud has been designed from the ground up to be a developer-friendly platform. The platform is composed of various services that can be used to deploy applications quickly and securely.
Deploy your bots to Square Cloud and receive the best solutions for bot hosting.
Square offers a strategic location for the most famous platforms, ensuring low latency and high availability.
Deploy your web applications to Square Cloud and receive the best solutions for web hosting.
We provide premium Cloudflare integration, fast DNS, and a Web Application Firewall (WAF) to ensure the best performance and security.
Store your data with Square Cloud and enjoy the benefits of serverless storage.
Our storage service is designed to be simple, scalable, and cost-effective.
Deploy managed MongoDB, PostgreSQL, MySQL, or Redis databases in seconds, with automatic snapshots and connection strings ready to copy into your application.
## Before you begin
Square Cloud is a paid platform — an active plan is required to deploy, so your project runs on production-grade infrastructure from day one. Create your account, then [select the plan](https://squarecloud.app/en/pricing) that's right for you (see [what each plan includes](/en/platform/plans)).
If you've never used Square before, sign up to get started.
If you already have an account, log in to get started.
## Upload your project 😁
You can upload your project to Square Cloud in a few simple steps, as shown below:
For this example, we will use the JavaScript (Node.js) language.
Next, you need to create a configuration file. Learn how in the [configuration file guide](/en/getting-started/config-file).
```systemd Example of a config file for a bot theme={null}
MAIN=index.js
MEMORY=512
VERSION=recommended
DISPLAY_NAME=Batman bot
DESCRIPTION=This bot is the dark knight of the night.
```
```systemd Example for website. (URL: "batman.squareweb.app") theme={null}
MAIN=index.js
MEMORY=512
VERSION=recommended
SUBDOMAIN=batman
START=npm run build && npm run start
DISPLAY_NAME=Batman website
DESCRIPTION=This website is the dark knight of the night.
```
After creating the configuration file, you need to zip your project.
Planning to deploy via the CLI below? You can skip this step — `squarecloud upload` zips your project for you.
```bash Windows theme={null}
1. Locate the file or folder that you want to zip.
2. Press and hold (or right-click) the file or folder, select (or point to) Send to, and then select Compressed (zipped) folder.
3. A new zipped folder with the same name is created in the same location. To rename it, press and hold (or right-click) the folder, select Rename, and then type the new name.
```
```bash Linux theme={null}
1. Locate the file or folder that you want to zip.
2. Right-click the file or folder, then choose Compress from the shortcut menu.
3. A new zipped folder with the same name is created in the same location. To rename it, press and hold (or right-click) the folder, select Rename, and then type the new name.
```
```bash macOS theme={null}
1. Locate the file or folder that you want to zip.
2. Control-click the file or folder, then choose Compress from the shortcut menu.
3. A new zipped folder with the same name is created in the same location. To rename it, press and hold (or right-click) the folder, select Rename, and then type the new name.
```
## Deploy it 😉
Choose how you want to deploy: through the dashboard (upload your ZIP) or with a single command using the CLI — the same workflow developers know from other modern platforms.
### Via dashboard
Access the [upload page](https://squarecloud.app/en/dashboard/new) and upload your project zip file.
After uploading your zip, you will need to configure the name, main file or runtime environment and other settings for your project.\
If you are uploading a web project, make sure to select "Web Publication" and set a subdomain to your project.
Finally, click on the "Deploy" button to host your project on Square Cloud.\
After deployment, you can monitor your project's status and logs from the dashboard.
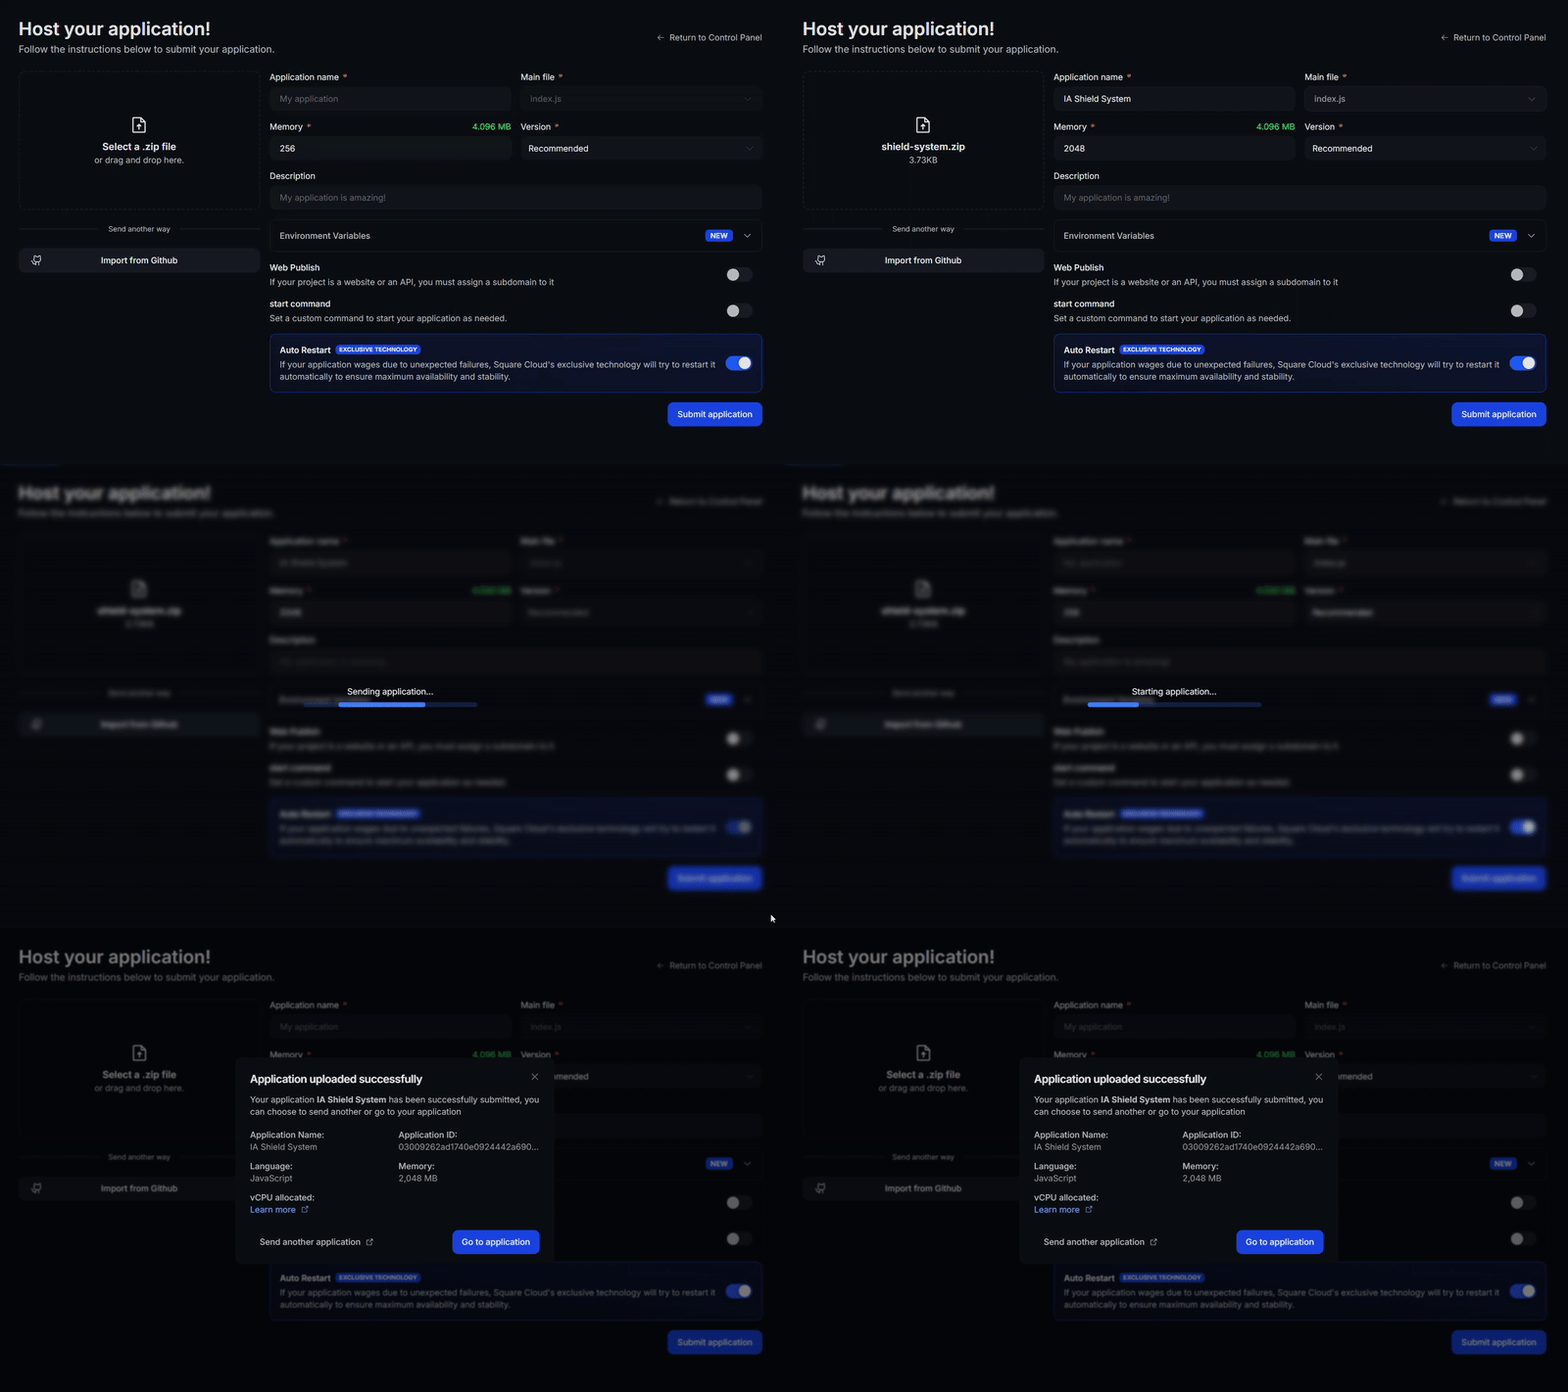 Your first deploy usually takes less than a minute. In the [dashboard](https://squarecloud.app/en/dashboard), wait for your application status to show as running and check the logs for any startup errors.\
If you deployed a website or API, open `https://.squareweb.app` in your browser — you should see your application responding. If you deployed a bot, send it a command to confirm it is online.
App not starting? See the [Troubleshooting guide](/en/platform/troubleshooting/app-wont-start) for the most common causes and fixes.
### Via CLI
To use this method, you need to create a config file named `squarecloud.app` in the root directory of your project. This file will contain the necessary configuration for your project.
Learn how to create the `squarecloud.app` configuration file that defines your application's environment.
First, you need to have the CLI installed in your environment. If you don't have it yet, run the following command in your terminal:
```
npm install -g @squarecloud/cli
```
If you already have it, we recommend updating it. To do this, run the following command in your terminal:
```bash theme={null}
squarecloud update
```
```bash theme={null}
curl -fsSL https://cli.squarecloud.app/install | bash
```
Now, to authenticate and use other CLI commands, you will find your authorization key [here](https://squarecloud.app/en/account/security) by clicking on "Request API Key". After obtaining your authorization key, run the following command:
```bash theme={null}
squarecloud auth login
```
Finally, to deploy your application to Square Cloud using the CLI, you need to run the following command:
```bash theme={null}
squarecloud upload
```
Or if you created the zip manually, you can use:
```bash theme={null}
squarecloud upload --file
```
Your first deploy usually takes less than a minute. Check your application status and logs directly from the terminal:
```bash theme={null}
squarecloud app status
squarecloud app logs
```
If you deployed a website or API, open `https://.squareweb.app` in your browser — you should see your application responding. If you deployed a bot, send it a command to confirm it is online.
App not starting? See the [Troubleshooting guide](/en/platform/troubleshooting/app-wont-start) for the most common causes and fixes.
Your first deploy usually takes less than a minute. In the [dashboard](https://squarecloud.app/en/dashboard), wait for your application status to show as running and check the logs for any startup errors.\
If you deployed a website or API, open `https://.squareweb.app` in your browser — you should see your application responding. If you deployed a bot, send it a command to confirm it is online.
App not starting? See the [Troubleshooting guide](/en/platform/troubleshooting/app-wont-start) for the most common causes and fixes.
### Via CLI
To use this method, you need to create a config file named `squarecloud.app` in the root directory of your project. This file will contain the necessary configuration for your project.
Learn how to create the `squarecloud.app` configuration file that defines your application's environment.
First, you need to have the CLI installed in your environment. If you don't have it yet, run the following command in your terminal:
```
npm install -g @squarecloud/cli
```
If you already have it, we recommend updating it. To do this, run the following command in your terminal:
```bash theme={null}
squarecloud update
```
```bash theme={null}
curl -fsSL https://cli.squarecloud.app/install | bash
```
Now, to authenticate and use other CLI commands, you will find your authorization key [here](https://squarecloud.app/en/account/security) by clicking on "Request API Key". After obtaining your authorization key, run the following command:
```bash theme={null}
squarecloud auth login
```
Finally, to deploy your application to Square Cloud using the CLI, you need to run the following command:
```bash theme={null}
squarecloud upload
```
Or if you created the zip manually, you can use:
```bash theme={null}
squarecloud upload --file
```
Your first deploy usually takes less than a minute. Check your application status and logs directly from the terminal:
```bash theme={null}
squarecloud app status
squarecloud app logs
```
If you deployed a website or API, open `https://.squareweb.app` in your browser — you should see your application responding. If you deployed a bot, send it a command to confirm it is online.
App not starting? See the [Troubleshooting guide](/en/platform/troubleshooting/app-wont-start) for the most common causes and fixes.