> ## Documentation Index
> Fetch the complete documentation index at: https://docs.squarecloud.app/llms.txt
> Use this file to discover all available pages before exploring further.
# How to Host Telegram Bots
> Learn to create and host Telegram bots on Square Cloud. Complete tutorial with configuration, deployment, and practical examples in Node.js and Python.
export const RecommendedPlan = ({lang, plan, tier, cpu, appType}) => {
const siteLang = lang === 'pt-br' ? 'pt-br' : 'en';
const url = `https://squarecloud.app/${siteLang}/pay?plan=${plan.toLowerCase()}&tier=${tier}`;
const proUrl = `https://squarecloud.app/${siteLang}/pay?plan=pro`;
const notes = {
'en':
Wondering how much RAM and CPU your plan needs to host {appType}?
Don't worry, we're here to help.
Our {plan} plan offers {tier}GB of RAM and {cpu}vCPU, which should be sufficient for most {appType}.
However, if you are working on a larger project and seeking extra stability, we recommend considering our Pro plan. With additional resources, you can maintain stability even during demand spikes.
To purchase, simply click here.
,
'pt-br':
Está se perguntando quanta RAM e CPU seu plano precisa para hospedar {appType}?
Não se preocupe, estamos aqui para ajudar.
Nosso plano {plan} oferece {tier}GB de RAM e {cpu}vCPU, o que deve ser suficiente para a maioria dos {appType}.
No entanto, se você estiver trabalhando em um projeto maior e precisar de mais estabilidade, recomendamos considerar nosso plano Pro.
Com recursos adicionais, você pode manter a estabilidade mesmo durante picos de demanda.
Para comprar, basta clicar aqui.
,
'es':
¿Te preguntas cuánta RAM y CPU necesita tu plan para alojar {appType}?
No te preocupes, estamos aquí para ayudarte.
Nuestro plan {plan} ofrece {tier}GB de RAM y {cpu}vCPU, lo que debería ser suficiente para la mayoría de {appType}.
Sin embargo, si estás trabajando en un proyecto más grande y buscas mayor estabilidad, te recomendamos considerar nuestro plan Pro.
Con recursos adicionales, puedes mantener la estabilidad incluso durante picos de demanda.
Para comprarlo, simplemente haz clic aquí.
,
'fr':
Vous vous demandez combien de RAM et de CPU votre plan doit offrir pour héberger {appType} ?
Pas d'inquiétude, nous sommes là pour vous aider.
Notre plan {plan} offre {tier} Go de RAM et {cpu} vCPU, ce qui devrait suffire pour la plupart des {appType}.
Cependant, si vous travaillez sur un projet plus important et recherchez une stabilité accrue, nous vous recommandons notre plan Pro.
Avec des ressources supplémentaires, vous conservez la stabilité même lors des pics de demande.
Pour l'acheter, cliquez simplement ici.
,
'de':
Sie fragen sich, wie viel RAM und CPU Ihr Plan zum Hosten von {appType} benötigt?
Keine Sorge, wir helfen Ihnen gerne.
Unser {plan}-Plan bietet {tier} GB RAM und {cpu} vCPU, was für die meisten {appType} ausreichen sollte.
Wenn Sie jedoch an einem größeren Projekt arbeiten und zusätzliche Stabilität benötigen, empfehlen wir unseren Pro-Plan.
Mit zusätzlichen Ressourcen bleibt Ihre Anwendung auch bei Lastspitzen stabil.
Zum Kauf klicken Sie einfach hier.
,
'it':
Ti stai chiedendo quanta RAM e CPU serve al tuo piano per ospitare {appType}?
Non preoccuparti, siamo qui per aiutarti.
Il nostro piano {plan} offre {tier}GB di RAM e {cpu}vCPU, che dovrebbero essere sufficienti per la maggior parte di {appType}.
Tuttavia, se stai lavorando a un progetto più grande e cerchi maggiore stabilità, ti consigliamo il nostro piano Pro.
Con risorse aggiuntive puoi mantenere la stabilità anche durante i picchi di richieste.
Per acquistarlo, fai clic qui.
,
'ja':
{appType}のホスティングに必要なRAMとCPUの容量が気になりますか?
ご安心ください。私たちがサポートします。
{plan}プランは{tier}GBのRAMと{cpu}vCPUを提供しており、ほとんどの{appType}には十分です。
より大規模なプロジェクトでさらなる安定性を求める場合は、Proプランをおすすめします。追加リソースにより、需要のピーク時でも安定性を維持できます。
ご購入はこちらをクリックしてください。
,
'zh':
想知道托管{appType}需要多少 RAM 和 CPU 吗?
别担心,我们来帮您。
我们的 {plan} 套餐提供 {tier}GB RAM 和 {cpu}vCPU,对大多数{appType}来说已经足够。
如果您的项目规模更大、需要更高的稳定性,我们推荐 Pro 套餐。借助额外资源,即使在需求高峰期也能保持稳定。
点击这里即可购买。
};
return notes[lang] || notes['en'];
};
export const appType_0 = "a Telegram bots"
## Introduction
To develop and host {appType_0} on Square Cloud, it's essential to follow a structured sequence of configurations and prerequisites. This technical guide will cover the entire process, from initial setup to production deployment.
### Prerequisites
* **Square Cloud Account**: Register through the [signup page](https://squarecloud.app/en/signup) using your email.
* **Active Paid Plan**: Ensures dedicated resources and optimized performance for your application. Check our [available plans](https://squarecloud.app/en/pricing) and choose the most suitable for your needs.
## Creating project
A Telegram account is essential for testing and interacting with your bot. If you don't have one, visit the [official Telegram website](https://telegram.org/) to create your account for free.
### Bot application on Telegram
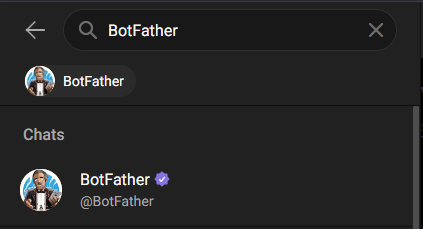
Access [Telegram Web](https://web.telegram.org/a/) and search for the official **BotFather** bot, responsible for creating and managing bots on the platform.
 Start a conversation with BotFather and type `/start`. Then, select the `/newbot` option to create a new bot. The system will ask for a name for your bot and, after confirmation, will automatically generate the necessary authentication token.
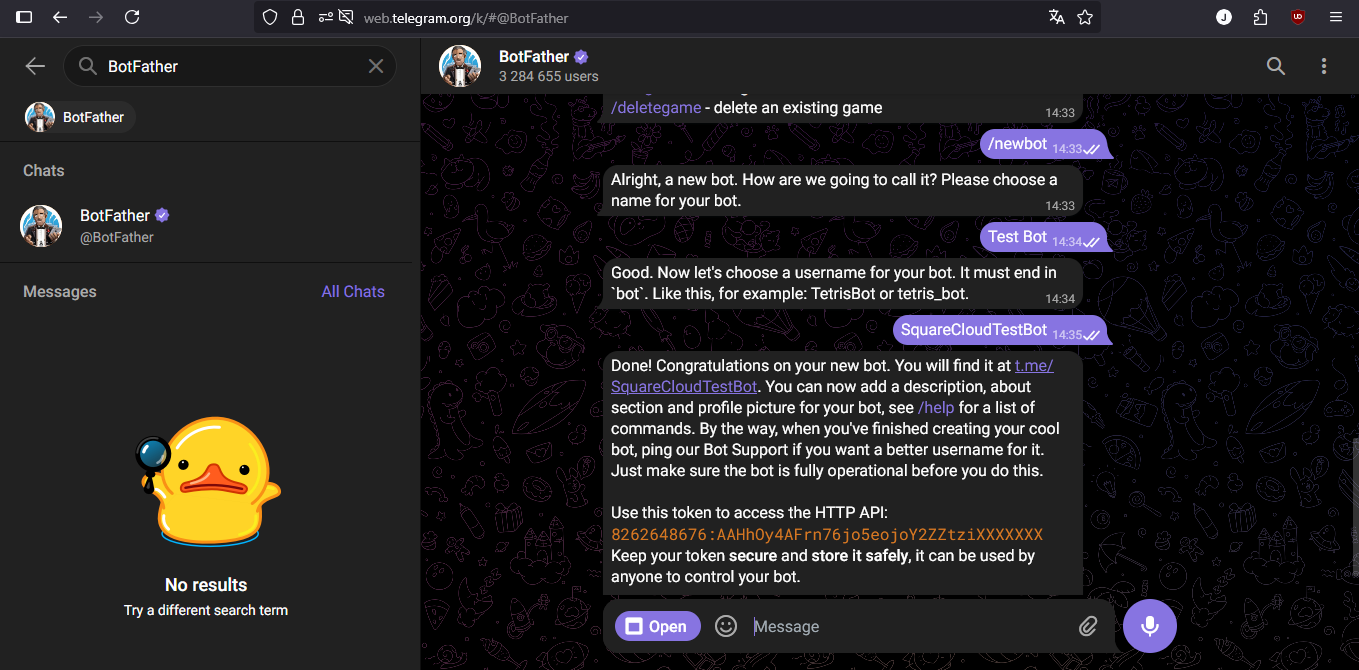 **Critical Security**: Keep your bot token absolutely secret. This token grants full control over the bot and should be treated as confidential information.
### Developing project
The choice of library or framework depends on the programming language you intend to use. Below are some of the most popular options:
**Environment Setup**
1. Verify that Node.js is installed on your system. Otherwise, download it from the [official Node.js website](https://nodejs.org/).
2. Initialize a new Node.js project:
```bash Terminal theme={null}
npm init -y
```
3. Install the grammY library:
```bash Terminal theme={null}
npm install grammy
```
**Basic Implementation**
4. Create the main file (`index.js`) with the following structure:
```javascript index.js theme={null}
const { Bot } = require("grammy");
// Authentication token configuration
const token = "YOUR_TOKEN_HERE";
// Bot initialization
const bot = new Bot(token);
(async () => {
// Get bot information
const botInfo = await bot.api.getMe();
const botName = botInfo.username;
// Define handler for text messages
bot.on("message:text", async (ctx) => {
const userMsg = ctx.message.text;
const responseMsg = `${botName} responds: ${userMsg}`;
await ctx.reply(responseMsg);
});
// Start the bot
bot.start();
console.log(`Bot ${botName} started successfully!`);
})();
```
**Environment Setup**
1. Verify that Python and pip are installed. Otherwise, download them from the [official Python website](https://www.python.org/).
2. Install the pyTelegramBotAPI library:
```bash Terminal theme={null}
pip install pyTelegramBotAPI
```
**Basic Implementation**
3. Create the main file (`main.py`):
```python main.py theme={null}
import telebot
# Authentication token configuration
TOKEN = "YOUR_TOKEN_HERE"
# Bot initialization
bot = telebot.TeleBot(TOKEN)
# Define handler for non-command messages
@bot.message_handler(func=lambda message: not message.text.startswith('/'))
def echo_handler(message):
# Get bot information
bot_info = bot.get_me()
bot_name = bot_info.username
# Format response message
response_msg = f"{bot_name} responds: {message.text}"
# Reply to the user
bot.reply_to(message, response_msg)
# Main execution
if __name__ == '__main__':
bot_info = bot.get_me()
print(f"Bot {bot_info.username} started successfully!")
# Start polling
bot.infinity_polling()
```
4. Create the `requirements.txt` file to manage dependencies:
```txt requirements.txt theme={null}
pyTelegramBotAPI
```
## Deploying
After preparing your project files, you can now upload them to Square Cloud and host your project.
To do so, create a ZIP file containing all your project files.
### Via dashboard
Access the [upload page](https://squarecloud.app/en/dashboard/new) and upload your project zip file.
After uploading your zip, you will need to configure the name, main file or runtime environment and other settings for your project.\
If you are uploading a web project, make sure to select "Web Publication" and set a subdomain to your project.
Finally, click on the "Deploy" button to host your project on Square Cloud.\
After deployment, you can monitor your project's status and logs from the dashboard.
**Critical Security**: Keep your bot token absolutely secret. This token grants full control over the bot and should be treated as confidential information.
### Developing project
The choice of library or framework depends on the programming language you intend to use. Below are some of the most popular options:
**Environment Setup**
1. Verify that Node.js is installed on your system. Otherwise, download it from the [official Node.js website](https://nodejs.org/).
2. Initialize a new Node.js project:
```bash Terminal theme={null}
npm init -y
```
3. Install the grammY library:
```bash Terminal theme={null}
npm install grammy
```
**Basic Implementation**
4. Create the main file (`index.js`) with the following structure:
```javascript index.js theme={null}
const { Bot } = require("grammy");
// Authentication token configuration
const token = "YOUR_TOKEN_HERE";
// Bot initialization
const bot = new Bot(token);
(async () => {
// Get bot information
const botInfo = await bot.api.getMe();
const botName = botInfo.username;
// Define handler for text messages
bot.on("message:text", async (ctx) => {
const userMsg = ctx.message.text;
const responseMsg = `${botName} responds: ${userMsg}`;
await ctx.reply(responseMsg);
});
// Start the bot
bot.start();
console.log(`Bot ${botName} started successfully!`);
})();
```
**Environment Setup**
1. Verify that Python and pip are installed. Otherwise, download them from the [official Python website](https://www.python.org/).
2. Install the pyTelegramBotAPI library:
```bash Terminal theme={null}
pip install pyTelegramBotAPI
```
**Basic Implementation**
3. Create the main file (`main.py`):
```python main.py theme={null}
import telebot
# Authentication token configuration
TOKEN = "YOUR_TOKEN_HERE"
# Bot initialization
bot = telebot.TeleBot(TOKEN)
# Define handler for non-command messages
@bot.message_handler(func=lambda message: not message.text.startswith('/'))
def echo_handler(message):
# Get bot information
bot_info = bot.get_me()
bot_name = bot_info.username
# Format response message
response_msg = f"{bot_name} responds: {message.text}"
# Reply to the user
bot.reply_to(message, response_msg)
# Main execution
if __name__ == '__main__':
bot_info = bot.get_me()
print(f"Bot {bot_info.username} started successfully!")
# Start polling
bot.infinity_polling()
```
4. Create the `requirements.txt` file to manage dependencies:
```txt requirements.txt theme={null}
pyTelegramBotAPI
```
## Deploying
After preparing your project files, you can now upload them to Square Cloud and host your project.
To do so, create a ZIP file containing all your project files.
### Via dashboard
Access the [upload page](https://squarecloud.app/en/dashboard/new) and upload your project zip file.
After uploading your zip, you will need to configure the name, main file or runtime environment and other settings for your project.\
If you are uploading a web project, make sure to select "Web Publication" and set a subdomain to your project.
Finally, click on the "Deploy" button to host your project on Square Cloud.\
After deployment, you can monitor your project's status and logs from the dashboard.
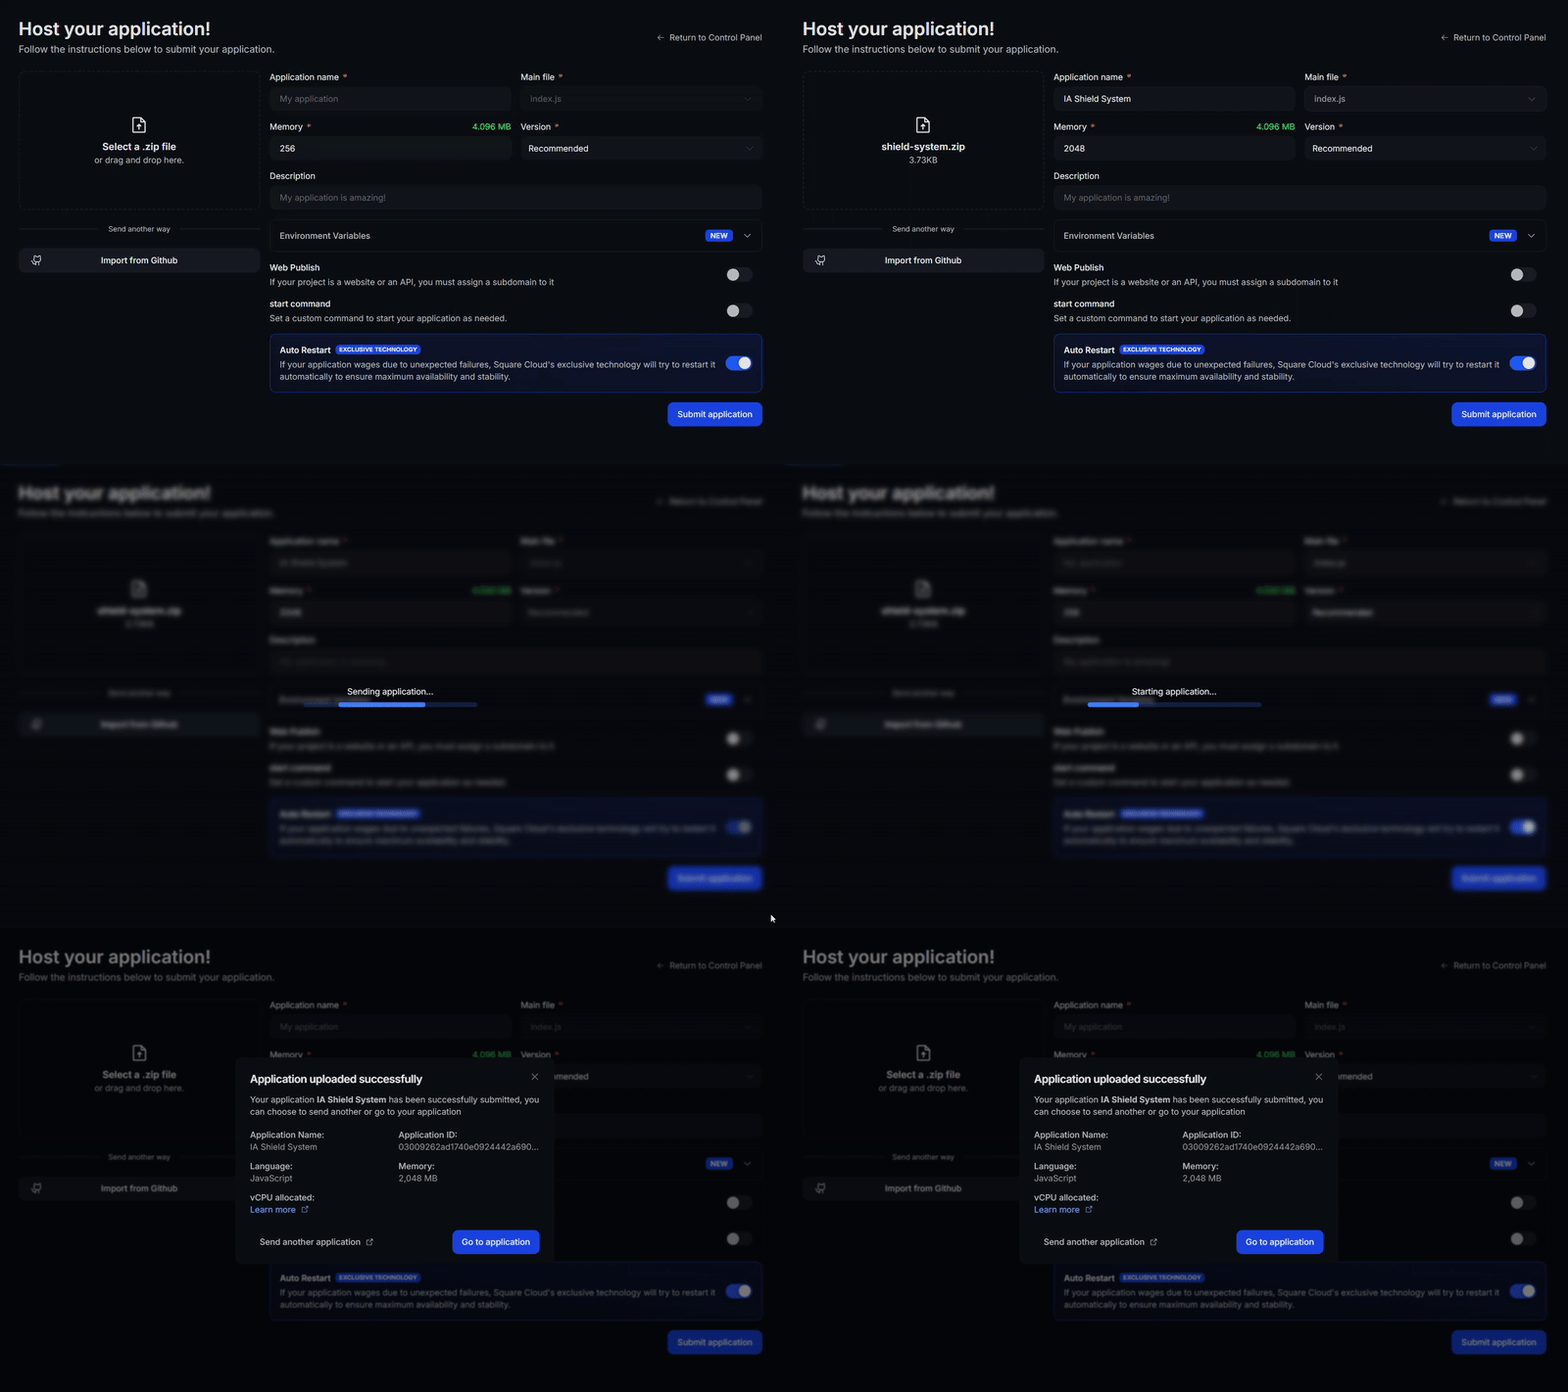 Your first deploy usually takes less than a minute. In the [dashboard](https://squarecloud.app/en/dashboard), wait for your application status to show as running and check the logs for any startup errors.\
If you deployed a website or API, open `https://.squareweb.app` in your browser — you should see your application responding. If you deployed a bot, send it a command to confirm it is online.
App not starting? See the [Troubleshooting guide](/en/platform/troubleshooting/app-wont-start) for the most common causes and fixes.
### Via CLI
To use this method, you need to create a config file named `squarecloud.app` in the root directory of your project. This file will contain the necessary configuration for your project.
Learn how to create the `squarecloud.app` configuration file that defines your application's environment.
First, you need to have the CLI installed in your environment. If you don't have it yet, run the following command in your terminal:
```
npm install -g @squarecloud/cli
```
If you already have it, we recommend updating it. To do this, run the following command in your terminal:
```bash theme={null}
squarecloud update
```
```bash theme={null}
curl -fsSL https://cli.squarecloud.app/install | bash
```
Now, to authenticate and use other CLI commands, you will find your authorization key [here](https://squarecloud.app/en/account/security) by clicking on "Request API Key". After obtaining your authorization key, run the following command:
```bash theme={null}
squarecloud auth login
```
Finally, to deploy your application to Square Cloud using the CLI, you need to run the following command:
```bash theme={null}
squarecloud upload
```
Or if you created the zip manually, you can use:
```bash theme={null}
squarecloud upload --file
```
Your first deploy usually takes less than a minute. Check your application status and logs directly from the terminal:
```bash theme={null}
squarecloud app status
squarecloud app logs
```
If you deployed a website or API, open `https://.squareweb.app` in your browser — you should see your application responding. If you deployed a bot, send it a command to confirm it is online.
App not starting? See the [Troubleshooting guide](/en/platform/troubleshooting/app-wont-start) for the most common causes and fixes.
## Testing the bot
After successful deployment, locate your bot on Telegram and send a test message. The bot should respond by echoing your message, confirming the correct implementation functionality.
Your first deploy usually takes less than a minute. In the [dashboard](https://squarecloud.app/en/dashboard), wait for your application status to show as running and check the logs for any startup errors.\
If you deployed a website or API, open `https://.squareweb.app` in your browser — you should see your application responding. If you deployed a bot, send it a command to confirm it is online.
App not starting? See the [Troubleshooting guide](/en/platform/troubleshooting/app-wont-start) for the most common causes and fixes.
### Via CLI
To use this method, you need to create a config file named `squarecloud.app` in the root directory of your project. This file will contain the necessary configuration for your project.
Learn how to create the `squarecloud.app` configuration file that defines your application's environment.
First, you need to have the CLI installed in your environment. If you don't have it yet, run the following command in your terminal:
```
npm install -g @squarecloud/cli
```
If you already have it, we recommend updating it. To do this, run the following command in your terminal:
```bash theme={null}
squarecloud update
```
```bash theme={null}
curl -fsSL https://cli.squarecloud.app/install | bash
```
Now, to authenticate and use other CLI commands, you will find your authorization key [here](https://squarecloud.app/en/account/security) by clicking on "Request API Key". After obtaining your authorization key, run the following command:
```bash theme={null}
squarecloud auth login
```
Finally, to deploy your application to Square Cloud using the CLI, you need to run the following command:
```bash theme={null}
squarecloud upload
```
Or if you created the zip manually, you can use:
```bash theme={null}
squarecloud upload --file
```
Your first deploy usually takes less than a minute. Check your application status and logs directly from the terminal:
```bash theme={null}
squarecloud app status
squarecloud app logs
```
If you deployed a website or API, open `https://.squareweb.app` in your browser — you should see your application responding. If you deployed a bot, send it a command to confirm it is online.
App not starting? See the [Troubleshooting guide](/en/platform/troubleshooting/app-wont-start) for the most common causes and fixes.
## Testing the bot
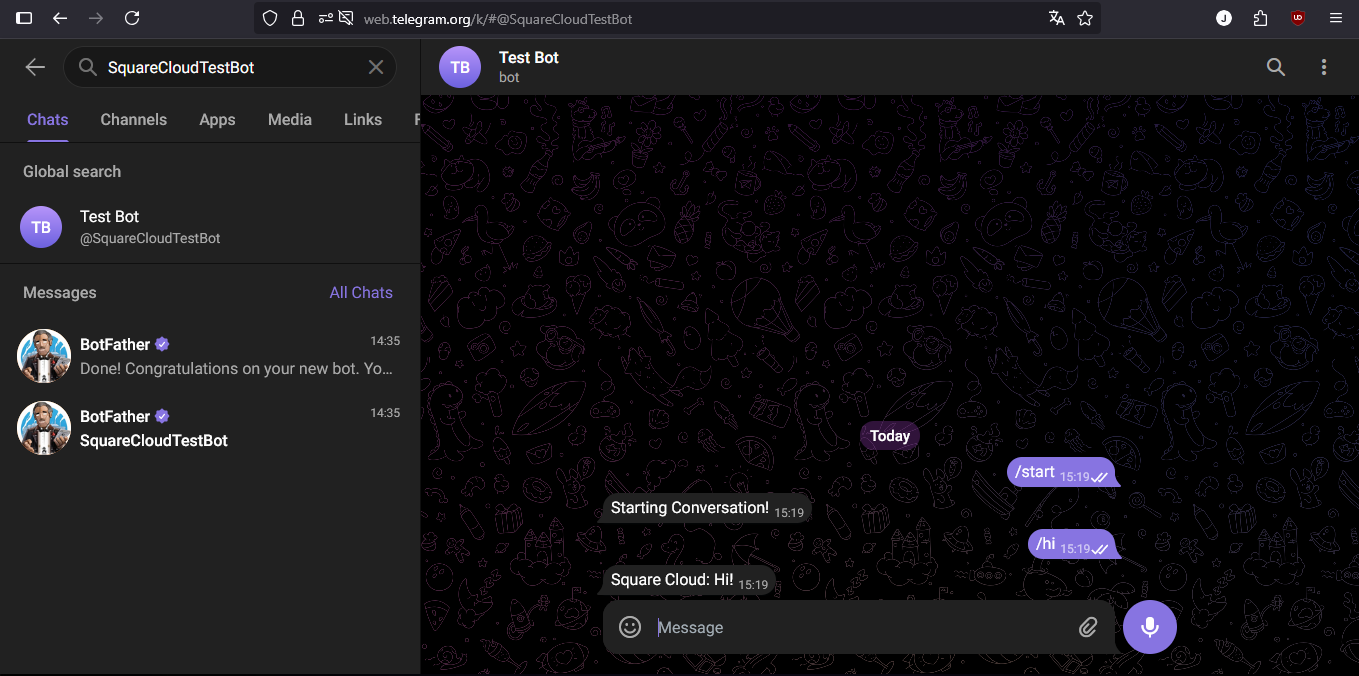
After successful deployment, locate your bot on Telegram and send a test message. The bot should respond by echoing your message, confirming the correct implementation functionality.
 ## Additional Resources
To deepen your knowledge about Telegram bot development, consult the [official pyTelegramBotAPI documentation](https://pypi.org/project/pyTelegramBotAPI/). The documentation offers detailed guides, advanced tutorials, and complete API reference.
## Contact us
If you continue facing **technical difficulties**, our **specialized support team** is available to assist you. [**Contact us**](https://squarecloud.app/en/support) and we'll be happy to help you resolve any issue — support quality is a big part of why developers rate Square Cloud [**4.9/5 across 402 reviews**](https://www.trustpilot.com/review/squarecloud.app) on Google and Trustpilot.
## Additional Resources
To deepen your knowledge about Telegram bot development, consult the [official pyTelegramBotAPI documentation](https://pypi.org/project/pyTelegramBotAPI/). The documentation offers detailed guides, advanced tutorials, and complete API reference.
## Contact us
If you continue facing **technical difficulties**, our **specialized support team** is available to assist you. [**Contact us**](https://squarecloud.app/en/support) and we'll be happy to help you resolve any issue — support quality is a big part of why developers rate Square Cloud [**4.9/5 across 402 reviews**](https://www.trustpilot.com/review/squarecloud.app) on Google and Trustpilot.