> ## Documentation Index
> Fetch the complete documentation index at: https://docs.squarecloud.app/llms.txt
> Use this file to discover all available pages before exploring further.
# How to Host Next.js Application
> Learn how to deploy your Next.js application on Square Cloud.
export const PortNote = ({lang}) => {
const t = {
'en': {
q: 'What port should I use for my server?',
a1: <>You should use port 80 for your server. Port 80 is the default port for HTTP traffic, which is handled by Square Cloud to route it to 443, HTTPS, for a secure connection.,
a2: 'Make sure to configure it before compressing and uploading your project.'
},
'pt-br': {
q: 'Qual porta devo usar para o meu servidor?',
a1: <>Você deve usar a porta 80 para o seu servidor. A porta 80 é a porta padrão para tráfego HTTP; a Square Cloud a encaminha para 443 (HTTPS) para estabelecer uma conexão segura.,
a2: 'Certifique-se de configurá-la antes de compactar e enviar seu projeto.'
},
'es': {
q: '¿Qué puerto debo usar para mi servidor?',
a1: <>Debes usar el puerto 80 para tu servidor. El puerto 80 es el puerto predeterminado para el tráfico HTTP; Square Cloud lo redirige al 443 (HTTPS) para establecer una conexión segura.,
a2: 'Asegúrate de configurarlo antes de comprimir y subir tu proyecto.'
},
'fr': {
q: 'Quel port dois-je utiliser pour mon serveur ?',
a1: <>Vous devez utiliser le port 80 pour votre serveur. Le port 80 est le port par défaut du trafic HTTP ; Square Cloud le redirige vers le port 443 (HTTPS) pour établir une connexion sécurisée.,
a2: "Assurez-vous de le configurer avant de compresser et d'envoyer votre projet."
},
'de': {
q: 'Welchen Port sollte ich für meinen Server verwenden?',
a1: <>Verwenden Sie Port 80 für Ihren Server. Port 80 ist der Standardport für HTTP-Traffic; Square Cloud leitet ihn für eine sichere Verbindung an Port 443 (HTTPS) weiter.,
a2: 'Stellen Sie sicher, dass Sie ihn konfigurieren, bevor Sie Ihr Projekt komprimieren und hochladen.'
},
'it': {
q: 'Quale porta devo usare per il mio server?',
a1: <>Devi usare la porta 80 per il tuo server. La porta 80 è la porta predefinita per il traffico HTTP; Square Cloud la instrada verso la 443 (HTTPS) per stabilire una connessione sicura.,
a2: 'Assicurati di configurarla prima di comprimere e caricare il tuo progetto.'
},
'ja': {
q: 'サーバーにはどのポートを使えばよいですか?',
a1: <>サーバーにはポート80を使用してください。ポート80はHTTPトラフィックのデフォルトポートで、Square Cloudが安全な接続のために443(HTTPS)へルーティングします。,
a2: 'プロジェクトを圧縮してアップロードする前に、必ず設定してください。'
},
'zh': {
q: '我的服务器应该使用哪个端口?',
a1: <>您的服务器应使用端口 80。端口 80 是 HTTP 流量的默认端口,Square Cloud 会将其路由到 443(HTTPS)以建立安全连接。,
a2: '请务必在压缩并上传项目之前完成配置。'
}
};
const c = t[lang] || t['en'];
return
{c.q}
{c.a1}
{c.a2}
;
};
export const RecommendedPlan = ({lang, plan, tier, cpu, appType}) => {
const siteLang = lang === 'pt-br' ? 'pt-br' : 'en';
const url = `https://squarecloud.app/${siteLang}/pay?plan=${plan.toLowerCase()}&tier=${tier}`;
const proUrl = `https://squarecloud.app/${siteLang}/pay?plan=pro`;
const notes = {
'en':
Wondering how much RAM and CPU your plan needs to host {appType}?
Don't worry, we're here to help.
Our {plan} plan offers {tier}GB of RAM and {cpu}vCPU, which should be sufficient for most {appType}.
However, if you are working on a larger project and seeking extra stability, we recommend considering our Pro plan. With additional resources, you can maintain stability even during demand spikes.
To purchase, simply click here.
,
'pt-br':
Está se perguntando quanta RAM e CPU seu plano precisa para hospedar {appType}?
Não se preocupe, estamos aqui para ajudar.
Nosso plano {plan} oferece {tier}GB de RAM e {cpu}vCPU, o que deve ser suficiente para a maioria dos {appType}.
No entanto, se você estiver trabalhando em um projeto maior e precisar de mais estabilidade, recomendamos considerar nosso plano Pro.
Com recursos adicionais, você pode manter a estabilidade mesmo durante picos de demanda.
Para comprar, basta clicar aqui.
,
'es':
¿Te preguntas cuánta RAM y CPU necesita tu plan para alojar {appType}?
No te preocupes, estamos aquí para ayudarte.
Nuestro plan {plan} ofrece {tier}GB de RAM y {cpu}vCPU, lo que debería ser suficiente para la mayoría de {appType}.
Sin embargo, si estás trabajando en un proyecto más grande y buscas mayor estabilidad, te recomendamos considerar nuestro plan Pro.
Con recursos adicionales, puedes mantener la estabilidad incluso durante picos de demanda.
Para comprarlo, simplemente haz clic aquí.
,
'fr':
Vous vous demandez combien de RAM et de CPU votre plan doit offrir pour héberger {appType} ?
Pas d'inquiétude, nous sommes là pour vous aider.
Notre plan {plan} offre {tier} Go de RAM et {cpu} vCPU, ce qui devrait suffire pour la plupart des {appType}.
Cependant, si vous travaillez sur un projet plus important et recherchez une stabilité accrue, nous vous recommandons notre plan Pro.
Avec des ressources supplémentaires, vous conservez la stabilité même lors des pics de demande.
Pour l'acheter, cliquez simplement ici.
,
'de':
Sie fragen sich, wie viel RAM und CPU Ihr Plan zum Hosten von {appType} benötigt?
Keine Sorge, wir helfen Ihnen gerne.
Unser {plan}-Plan bietet {tier} GB RAM und {cpu} vCPU, was für die meisten {appType} ausreichen sollte.
Wenn Sie jedoch an einem größeren Projekt arbeiten und zusätzliche Stabilität benötigen, empfehlen wir unseren Pro-Plan.
Mit zusätzlichen Ressourcen bleibt Ihre Anwendung auch bei Lastspitzen stabil.
Zum Kauf klicken Sie einfach hier.
,
'it':
Ti stai chiedendo quanta RAM e CPU serve al tuo piano per ospitare {appType}?
Non preoccuparti, siamo qui per aiutarti.
Il nostro piano {plan} offre {tier}GB di RAM e {cpu}vCPU, che dovrebbero essere sufficienti per la maggior parte di {appType}.
Tuttavia, se stai lavorando a un progetto più grande e cerchi maggiore stabilità, ti consigliamo il nostro piano Pro.
Con risorse aggiuntive puoi mantenere la stabilità anche durante i picchi di richieste.
Per acquistarlo, fai clic qui.
,
'ja':
{appType}のホスティングに必要なRAMとCPUの容量が気になりますか?
ご安心ください。私たちがサポートします。
{plan}プランは{tier}GBのRAMと{cpu}vCPUを提供しており、ほとんどの{appType}には十分です。
より大規模なプロジェクトでさらなる安定性を求める場合は、Proプランをおすすめします。追加リソースにより、需要のピーク時でも安定性を維持できます。
ご購入はこちらをクリックしてください。
,
'zh':
想知道托管{appType}需要多少 RAM 和 CPU 吗?
别担心,我们来帮您。
我们的 {plan} 套餐提供 {tier}GB RAM 和 {cpu}vCPU,对大多数{appType}来说已经足够。
如果您的项目规模更大、需要更高的稳定性,我们推荐 Pro 套餐。借助额外资源,即使在需求高峰期也能保持稳定。
点击这里即可购买。
};
return notes[lang] || notes['en'];
};
export const appType_0 = "a Next.js application"
## Introduction
To develop and host {appType_0} on Square Cloud, it's essential to follow a structured sequence of configurations and prerequisites. This technical guide will cover the entire process, from initial setup to production deployment.
### Prerequisites
* **Square Cloud Account**: Register through the [signup page](https://squarecloud.app/en/signup) using your email.
* **Active Paid Plan**: Ensures dedicated resources and optimized performance for your application. Check our [available plans](https://squarecloud.app/en/pricing) and choose the most suitable for your needs.
## Creating project
Before you begin, make sure you have Node.js and npm installed on your system. If you don't have them yet, you can download them from the [official Node.js website](https://nodejs.org/).
To create a new Next.js project, run the following command:
```bash theme={null}
npx create-next-app@latest my-app
```
In this command, `my-app` is the name of your new project. You can replace `my-app` with any name you want for your project. The `npx` command is a tool that comes with `npm`, the Node.js package manager. It is used to run Node.js packages that are installed locally in your project or are available remotely on the npm registry.
`create-next-app` is a package available on the npm registry that sets up a new Next.js project automatically. It takes care of all the initial setup, such as creating the project directory, installing necessary dependencies, and configuring basic files.
`@latest` is a tag specifying that you want to use the latest version of the `create-next-app` package. This ensures you're always using the most updated version and, consequently, have access to the latest features.
### Configuring Port 80
Port 80 is the default port for HTTP traffic. To host a Next.js website on Square Cloud, it's crucial to configure the use of port 80. In Next.js, you can set the `-p 80` parameter in the startup script to ensure your website runs correctly on this port.
```json package.json theme={null}
{
"name": "my-app",
"version": "0.1.0",
"private": true,
"scripts": {
"dev": "next dev",
"build": "next build",
"start": "next start -p 80",
"lint": "next lint"
},
"dependencies": {
"react": "^18",
"react-dom": "^18",
"next": "14.1.0"
},
"devDependencies": {
"autoprefixer": "^10.0.1",
"postcss": "^8",
"tailwindcss": "^3.3.0",
"eslint": "^8",
"eslint-config-next": "14.1.0"
}
}
```
## Building project
Build the production output before uploading:
```bash theme={null}
npm run build
```
This will generate the next bundle for production. Generating the `.next` folder.
## Deploying
After preparing your project files, you can now upload them to Square Cloud and host your project.
To do so, create a ZIP file containing all your project files. \
Make sure to not include the `cache` folder from `.next`.
### Via dashboard
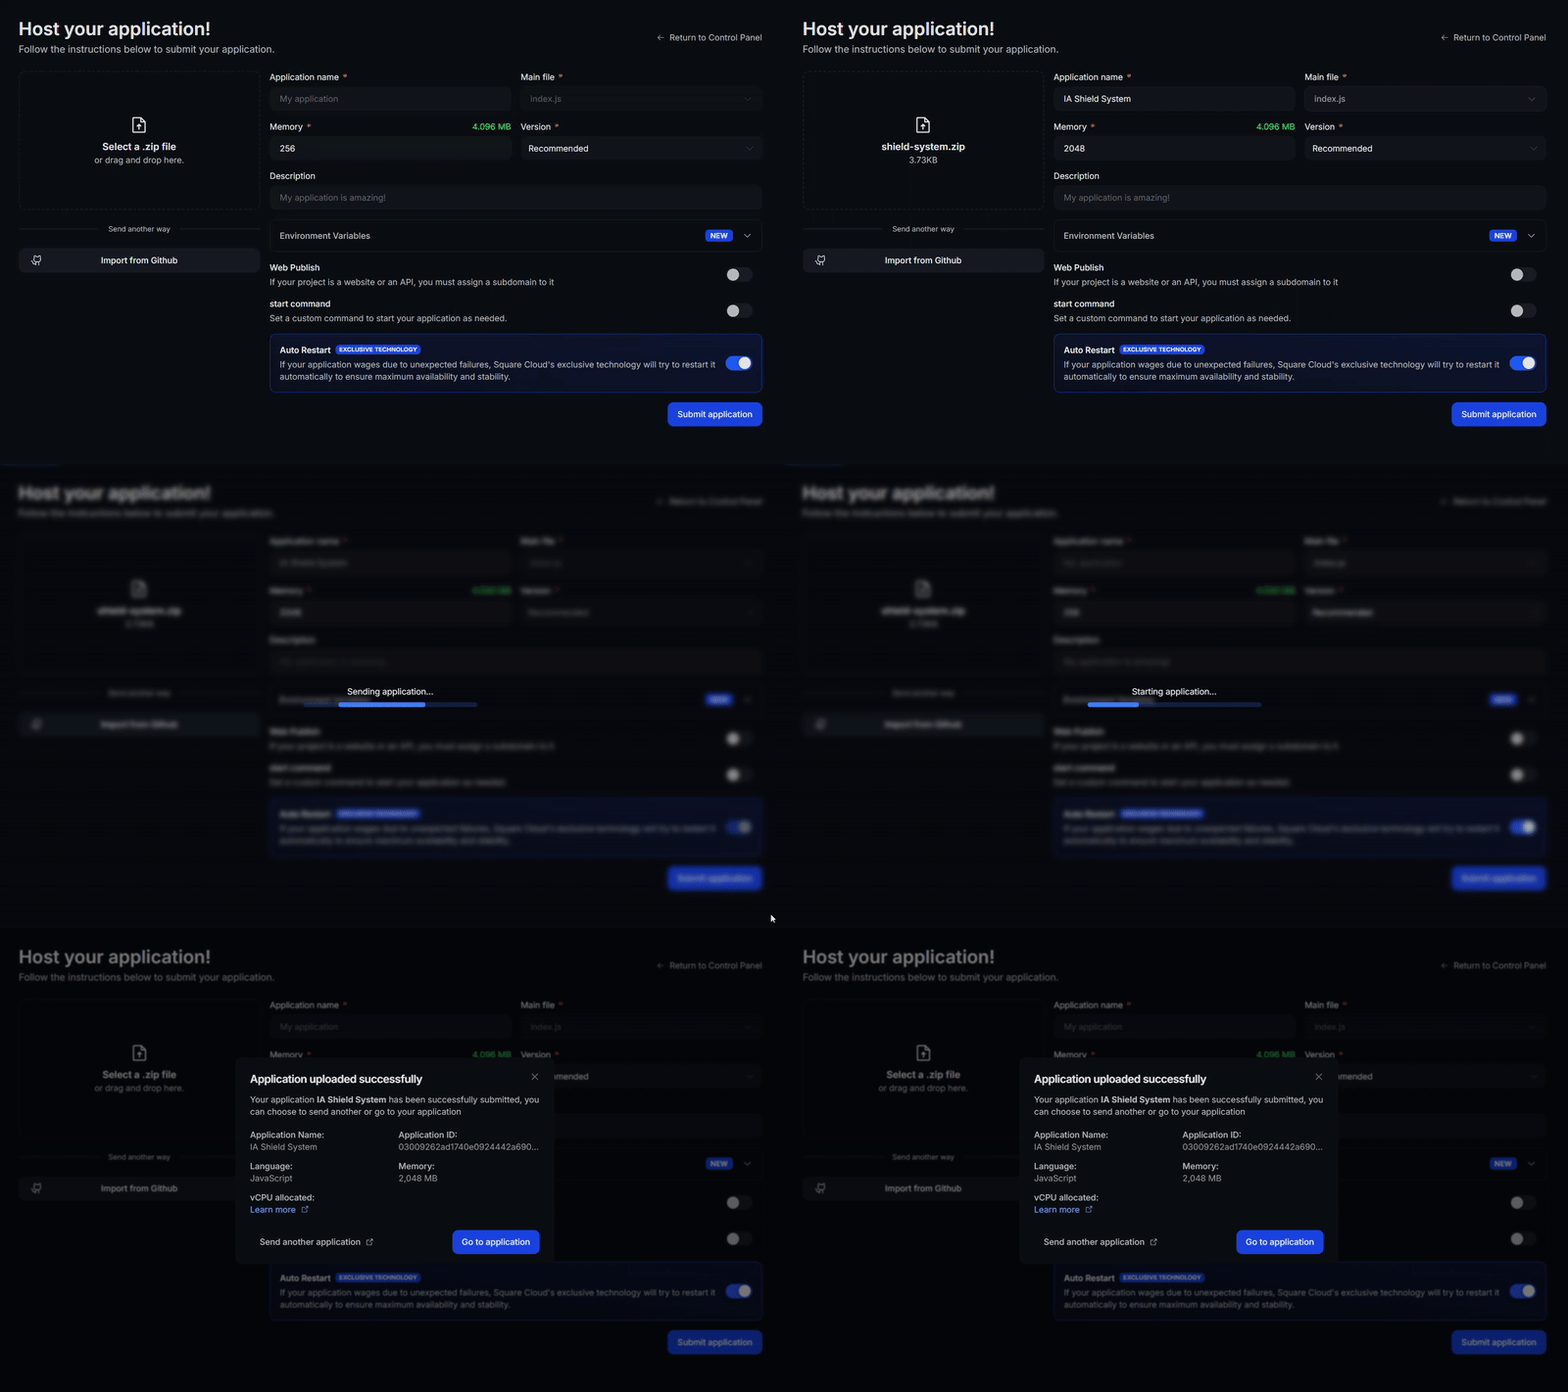
Access the [upload page](https://squarecloud.app/en/dashboard/new) and upload your project zip file.
After uploading your zip, you will need to configure the name, main file or runtime environment and other settings for your project.\
If you are uploading a web project, make sure to select "Web Publication" and set a subdomain to your project.
Finally, click on the "Deploy" button to host your project on Square Cloud.\
After deployment, you can monitor your project's status and logs from the dashboard.
 Your first deploy usually takes less than a minute. In the [dashboard](https://squarecloud.app/en/dashboard), wait for your application status to show as running and check the logs for any startup errors.\
If you deployed a website or API, open `https://.squareweb.app` in your browser — you should see your application responding. If you deployed a bot, send it a command to confirm it is online.
App not starting? See the [Troubleshooting guide](/en/platform/troubleshooting/app-wont-start) for the most common causes and fixes.
### Via CLI
To use this method, you need to create a config file named `squarecloud.app` in the root directory of your project. This file will contain the necessary configuration for your project.
Learn how to create the `squarecloud.app` configuration file that defines your application's environment.
First, you need to have the CLI installed in your environment. If you don't have it yet, run the following command in your terminal:
```
npm install -g @squarecloud/cli
```
If you already have it, we recommend updating it. To do this, run the following command in your terminal:
```bash theme={null}
squarecloud update
```
```bash theme={null}
curl -fsSL https://cli.squarecloud.app/install | bash
```
Now, to authenticate and use other CLI commands, you will find your authorization key [here](https://squarecloud.app/en/account/security) by clicking on "Request API Key". After obtaining your authorization key, run the following command:
```bash theme={null}
squarecloud auth login
```
Finally, to deploy your application to Square Cloud using the CLI, you need to run the following command:
```bash theme={null}
squarecloud upload
```
Or if you created the zip manually, you can use:
```bash theme={null}
squarecloud upload --file
```
Your first deploy usually takes less than a minute. Check your application status and logs directly from the terminal:
```bash theme={null}
squarecloud app status
squarecloud app logs
```
If you deployed a website or API, open `https://.squareweb.app` in your browser — you should see your application responding. If you deployed a bot, send it a command to confirm it is online.
App not starting? See the [Troubleshooting guide](/en/platform/troubleshooting/app-wont-start) for the most common causes and fixes.
## Troubleshooting
### Custom Domain
To use a custom domain (e.g., `mysite.com`) instead of the default URL `mysite.squareweb.app`, you need the **Standard plan or higher**. The subdomain is defined by the **SUBDOMAIN** field in the configuration file.
### Minimum RAM Requirements
**Minimum: 512MB RAM** for simple websites/APIs. For sites with frameworks (Next.JS, React, Vue, Angular, etc.), we always recommend **at least 1GB RAM**. For larger applications, allocate more RAM to prevent the application from running out of memory and crashing.
### Could not find this site.
Check if the **subdomain/domain** matches what's configured in the **SUBDOMAIN** field or in the **custom domain settings**. If you just uploaded the site, wait up to **60 seconds** for Square to enable **first access**.
### Site took too long to respond...
Check if you correctly configured **port 80** and **host 0.0.0.0** in the application. We recommend using Square's forced environment variables: **PORT** and **HOST** from the `.env` file.
## Additional Resources
For more information about Next.js and its tools, visit the [official Next.js documentation](https://nextjs.org/docs).
There, you will find detailed guides, tutorials, and API documentation to help you make the most of Next.js.
### CI/CD
We have a GitHub Action that makes easier to update your project. You can see more [here](https://squarecloud.app/en/resources/github-action)\
You can make a workflow like this:
```yml theme={null}
name: "Deploy Nextjs app"
on:
push:
tags:
- "v*"
jobs:
build-and-deploy:
runs-on: ubuntu-latest
steps:
- uses: actions/checkout@v4
- uses: actions/setup-node@v4
with:
node-version: 22
- name: Install dependencies
run: npm install
- name: Build website
run: npm run build && chmod -R 777 .next next.config.ts package.json
- name: Add website to zip
run: zip -r project.zip package.json .next next.config.ts public -x ".next/cache/*"
- name: Deploy on Square Cloud
uses: squarecloudofc/github-action@v2
with:
command: commit --file project.zip ${{ secrets.SQUARECLOUD_APP_ID }}
token: '${{ secrets.SQUARE_CLOUD_TOKEN }}'
```
## Contact us
If you continue facing **technical difficulties**, our **specialized support team** is available to assist you. [**Contact us**](https://squarecloud.app/en/support) and we'll be happy to help you resolve any issue — support quality is a big part of why developers rate Square Cloud [**4.9/5 across 402 reviews**](https://www.trustpilot.com/review/squarecloud.app) on Google and Trustpilot.
Your first deploy usually takes less than a minute. In the [dashboard](https://squarecloud.app/en/dashboard), wait for your application status to show as running and check the logs for any startup errors.\
If you deployed a website or API, open `https://.squareweb.app` in your browser — you should see your application responding. If you deployed a bot, send it a command to confirm it is online.
App not starting? See the [Troubleshooting guide](/en/platform/troubleshooting/app-wont-start) for the most common causes and fixes.
### Via CLI
To use this method, you need to create a config file named `squarecloud.app` in the root directory of your project. This file will contain the necessary configuration for your project.
Learn how to create the `squarecloud.app` configuration file that defines your application's environment.
First, you need to have the CLI installed in your environment. If you don't have it yet, run the following command in your terminal:
```
npm install -g @squarecloud/cli
```
If you already have it, we recommend updating it. To do this, run the following command in your terminal:
```bash theme={null}
squarecloud update
```
```bash theme={null}
curl -fsSL https://cli.squarecloud.app/install | bash
```
Now, to authenticate and use other CLI commands, you will find your authorization key [here](https://squarecloud.app/en/account/security) by clicking on "Request API Key". After obtaining your authorization key, run the following command:
```bash theme={null}
squarecloud auth login
```
Finally, to deploy your application to Square Cloud using the CLI, you need to run the following command:
```bash theme={null}
squarecloud upload
```
Or if you created the zip manually, you can use:
```bash theme={null}
squarecloud upload --file
```
Your first deploy usually takes less than a minute. Check your application status and logs directly from the terminal:
```bash theme={null}
squarecloud app status
squarecloud app logs
```
If you deployed a website or API, open `https://.squareweb.app` in your browser — you should see your application responding. If you deployed a bot, send it a command to confirm it is online.
App not starting? See the [Troubleshooting guide](/en/platform/troubleshooting/app-wont-start) for the most common causes and fixes.
## Troubleshooting
### Custom Domain
To use a custom domain (e.g., `mysite.com`) instead of the default URL `mysite.squareweb.app`, you need the **Standard plan or higher**. The subdomain is defined by the **SUBDOMAIN** field in the configuration file.
### Minimum RAM Requirements
**Minimum: 512MB RAM** for simple websites/APIs. For sites with frameworks (Next.JS, React, Vue, Angular, etc.), we always recommend **at least 1GB RAM**. For larger applications, allocate more RAM to prevent the application from running out of memory and crashing.
### Could not find this site.
Check if the **subdomain/domain** matches what's configured in the **SUBDOMAIN** field or in the **custom domain settings**. If you just uploaded the site, wait up to **60 seconds** for Square to enable **first access**.
### Site took too long to respond...
Check if you correctly configured **port 80** and **host 0.0.0.0** in the application. We recommend using Square's forced environment variables: **PORT** and **HOST** from the `.env` file.
## Additional Resources
For more information about Next.js and its tools, visit the [official Next.js documentation](https://nextjs.org/docs).
There, you will find detailed guides, tutorials, and API documentation to help you make the most of Next.js.
### CI/CD
We have a GitHub Action that makes easier to update your project. You can see more [here](https://squarecloud.app/en/resources/github-action)\
You can make a workflow like this:
```yml theme={null}
name: "Deploy Nextjs app"
on:
push:
tags:
- "v*"
jobs:
build-and-deploy:
runs-on: ubuntu-latest
steps:
- uses: actions/checkout@v4
- uses: actions/setup-node@v4
with:
node-version: 22
- name: Install dependencies
run: npm install
- name: Build website
run: npm run build && chmod -R 777 .next next.config.ts package.json
- name: Add website to zip
run: zip -r project.zip package.json .next next.config.ts public -x ".next/cache/*"
- name: Deploy on Square Cloud
uses: squarecloudofc/github-action@v2
with:
command: commit --file project.zip ${{ secrets.SQUARECLOUD_APP_ID }}
token: '${{ secrets.SQUARE_CLOUD_TOKEN }}'
```
## Contact us
If you continue facing **technical difficulties**, our **specialized support team** is available to assist you. [**Contact us**](https://squarecloud.app/en/support) and we'll be happy to help you resolve any issue — support quality is a big part of why developers rate Square Cloud [**4.9/5 across 402 reviews**](https://www.trustpilot.com/review/squarecloud.app) on Google and Trustpilot.