Introduction
To develop and host on Square Cloud, it’s essential to follow a structured sequence of configurations and prerequisites. This technical guide will cover the entire process, from initial setup to production deployment.Prerequisites
- Square Cloud Account: Register through the signup page using your email.
- Active Paid Plan: Ensures dedicated resources and optimized performance for your application. Check our available plans and choose the most suitable for your needs.
Wondering how much RAM and CPU your plan needs to host Angular applications?
Don't worry, we're here to help. Our Standard plan offers 4GB of RAM and 4vCPU, which should be sufficient for most Angular applications. However, if you are working on a larger project and seeking extra stability, we recommend considering our Pro plan. With additional resources, you can maintain stability even during demand spikes. To purchase, simply click here.
Don't worry, we're here to help. Our Standard plan offers 4GB of RAM and 4vCPU, which should be sufficient for most Angular applications. However, if you are working on a larger project and seeking extra stability, we recommend considering our Pro plan. With additional resources, you can maintain stability even during demand spikes. To purchase, simply click here.
Creating project
Before starting, make sure you have Node.js and npm installed on your system. If you don’t have them yet, you can download them from the official Node.js website.CLI installation
To create an Angular project, you need to install the Angular CLI. Run the following command:Developing project
Now create a new Angular project:http://localhost:80.
To generate a simple component, use:
Building project
Before uploading your project to Square Cloud, build the production bundle:dist/{PROJECT_NAME} folder.
Choosing a production server
To serve your Angular application in production, you need to use a server. You can create your own or use existing ones.Express library
To serve your static project on Square Cloud, ensure your server correctly delivers static files. To use Node.js with Express, a common setup is:server.js
Adjust
dist paths parameters to your project build folder. If it is in a folder inside build or dist, use it path instead.Serve library
Installing the Serve Library
To install theserve library, navigate to your project directory in the terminal and run the following command:
14.2.3 of the serve library. If you want to install the latest version, you can omit the @14.2.3.
Configuring the Startup Script
After installing theserve library, you need to configure your project’s startup script to use serve. To do this, open your project’s package.json file and add a new script called start:prod:
start:prod script, serve -s build -l 80 does the following:
serve: This is the command to start theserveserver.-s dist: The-soption serves thedistdirectory in single-page application mode. This means all not-found requests will be redirected toindex.html. Thedistdirectory is commonly created when you runnpm run build.-l 80: The-loption followed by80tellsserveto listen on port 80. Port 80 is the default port for HTTP traffic.
Adjust
dist parameter to your project build folder. If it is in a folder inside build or dist, use it path instead.Deploying
After preparing your project files, you can now upload them to Square Cloud and host your project. To do so, create a ZIP file containing all your project files.What port should I use for my server?
You should use port 80 for your server. Port 80 is the default port for HTTP traffic, which is handled by Square Cloud to route it to 443, HTTPS, for a secure connection.
Make sure to configure it before compressing and uploading your project.
You should use port 80 for your server. Port 80 is the default port for HTTP traffic, which is handled by Square Cloud to route it to 443, HTTPS, for a secure connection.
Make sure to configure it before compressing and uploading your project.
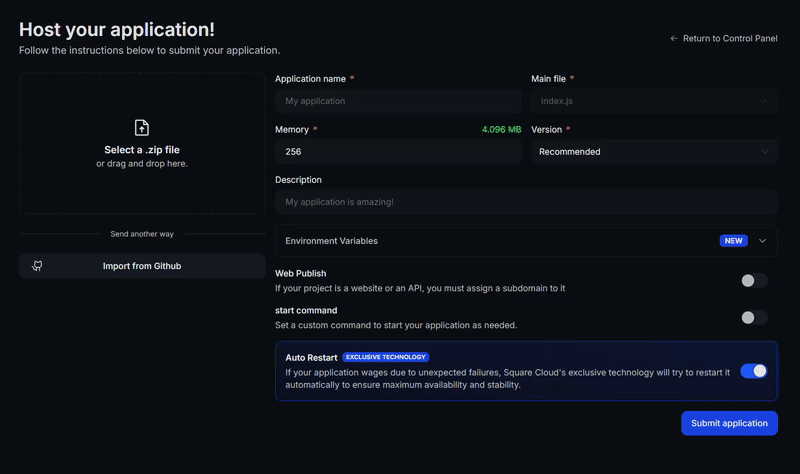
Via dashboard
Access the Upload Page
Access the upload page and upload your project zip file.
Configure Your Environment
After uploading your zip, you will need to configure the name, main file or runtime environment and other settings for your project.
If you are uploading a web project, make sure to select “Web Publication” and set a subdomain to your project.
If you are uploading a web project, make sure to select “Web Publication” and set a subdomain to your project.
Via CLI
To use this method, you need to create a config file namedsquarecloud.app in the root directory of your project. This file will contain the necessary configuration for your project.
Learn more about: how to create the configuration file for Square Cloud.
The squarecloud.app file is a configuration file that will be used to configure your application; it will be used to define your environment.
Install the CLI
First, you need to have the CLI installed in your environment. If you don’t have it yet, run the following command in your terminal:If you already have it, we recommend updating it. To do this, run the following command in your terminal:
- Windows
- Linux, macOS, and WSL
Authenticate
Now, to authenticate and use other CLI commands, you will find your authorization key here by clicking on “Request API Key”. After obtaining your authorization key, run the following command:
Additional Resources
For more information about Angular, visit the official documentation here.Troubleshooting
Custom Domain
To use a custom domain (e.g.,
mysite.com) instead of the default URL mysite.squareweb.app, you need the Standard plan or higher. The subdomain is defined by the SUBDOMAIN field in the configuration file. See: How to set up your custom domain.Minimum RAM Requirements
Minimum: 512MB RAM for simple websites/APIs. For sites with frameworks (Next.JS, React, Vue, Angular, etc.), we always recommend at least 1GB RAM. For larger applications, use more RAM to avoid LACK_OF_RAM error and ensure performance.
Could not find this site.
Check if the subdomain/domain matches what’s configured in the SUBDOMAIN field or in the custom domain settings. If you just uploaded the site, wait up to 60 seconds for Square to enable first access.
Site took too long to respond…
Check if you correctly configured port 80 and host 0.0.0.0 in the application. We recommend using Square’s forced environment variables: PORT and HOST from the 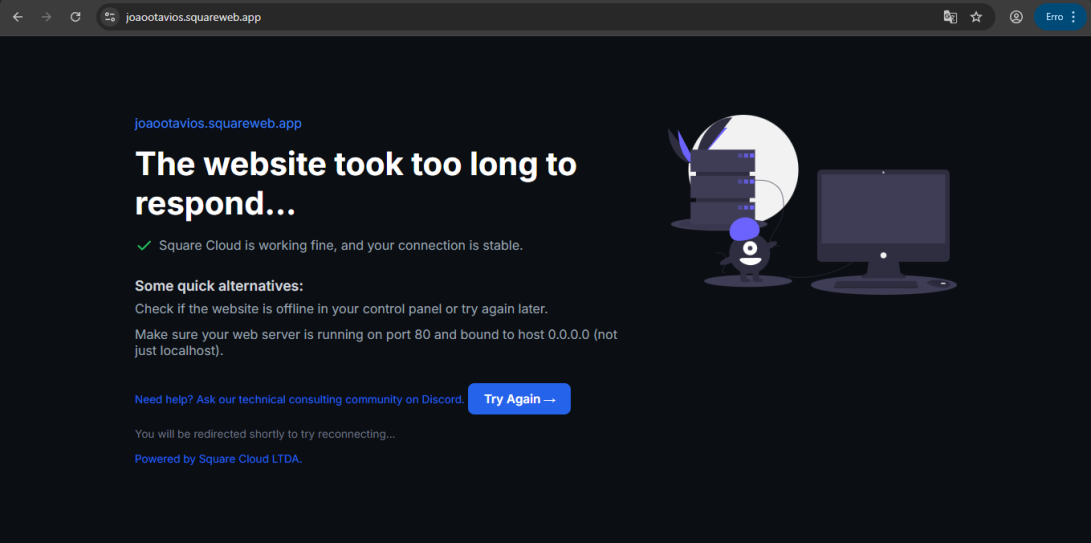
.env file.